

|

|

|

|

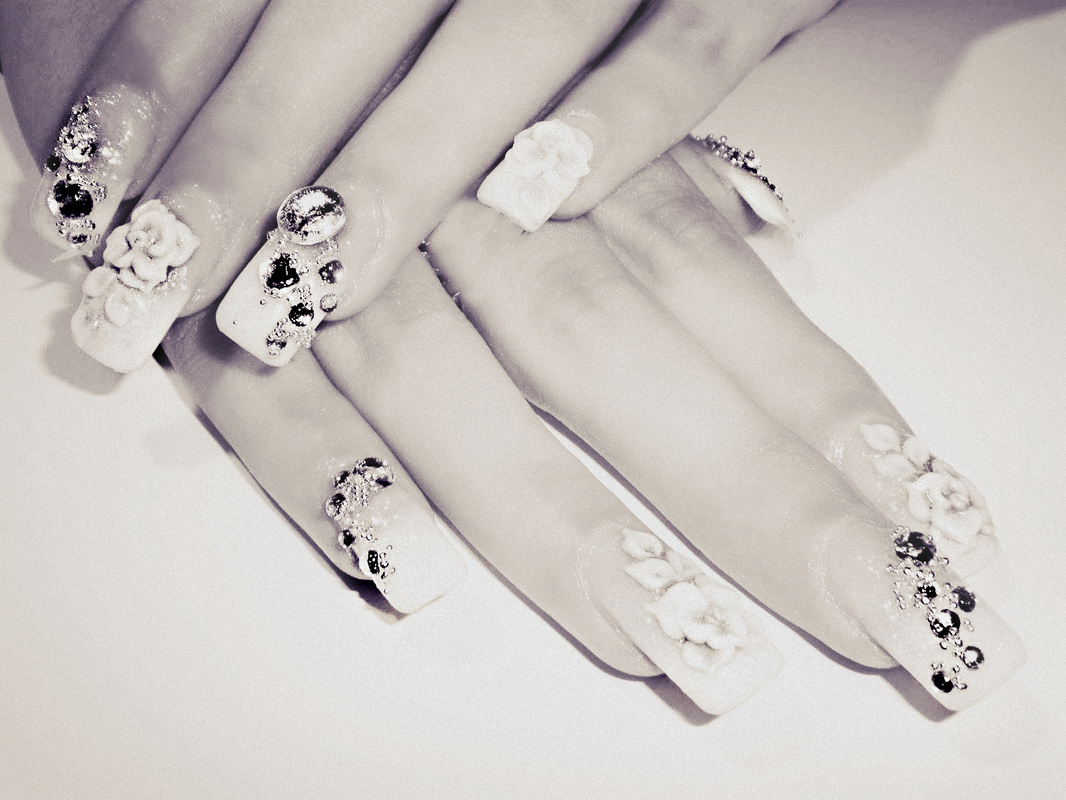
MONSTERS UNIVERSITY!!
Monsters Inc is one of my favourite films and the sequel inspired me to design these nails. Usually i would paint my own nails because i don't like wearing falsies but i wanted to make them look as neat as possible and spend some time on them...try doing these?
You Will Need:
False Nails,Nail glue, Nail Art Pens, Nail Polishes, 10 Cotton Buds (or a pro nail stand but the cotton buds are just as good), Sellotape.
Tutorials Coming Soon!

|

|

How To Nail The Perfect Engagement Manicure:
You want nice nails when showing off your engagement ring, so keep your nails neat and clean. They can look really nice short and round or medium sized and square its up to you, i have done two different designs for you to try out and one is very simple and doesnt overshadow the ring which i think is very important and the second nail design is a bit more glam and may suit an egagement/wedding party more. You want to aim for beautiful, soft and feminine nails because the ring should be the main focus but the nails should compliment it, try going for soft pinks and nude beige shades. The best thing to do is find a shade that is closest to your skin colour. Next buy some nail gems or decals to stick on, you can get really cheap decals from lots of places, check out the how to page by clicking the button below to find out how to apply nail decals, 3D accessories,nail wraps and much more. A french manicure with small decals would look stunning when showing off your ring.
You want nice nails when showing off your engagement ring, so keep your nails neat and clean. They can look really nice short and round or medium sized and square its up to you, i have done two different designs for you to try out and one is very simple and doesnt overshadow the ring which i think is very important and the second nail design is a bit more glam and may suit an egagement/wedding party more. You want to aim for beautiful, soft and feminine nails because the ring should be the main focus but the nails should compliment it, try going for soft pinks and nude beige shades. The best thing to do is find a shade that is closest to your skin colour. Next buy some nail gems or decals to stick on, you can get really cheap decals from lots of places, check out the how to page by clicking the button below to find out how to apply nail decals, 3D accessories,nail wraps and much more. A french manicure with small decals would look stunning when showing off your ring.

Presenting this ultra stylish animal print nail art which was inspired by my college bag's pattern! This is not as difficult as you may think and once you get the hang of it you should find it an easy design to achieve.
1. Firstly paint your nails a colour of your choice i used white nail polish from Superdrug (£1.99).
2. Next get a black nail art pen and put random large dots on to your nails after the base coat is dry.
3. If you dont own a nail art pen you can use something like a toothpick or a cocktail stick and dip it in black nail varnish and it will still create the same effect (maybe even better).
4.Let your nails dry then with as many colours you can find then begin to add colour on top of each black dot with either a nail pen or a tool of your choice but try leave a black outline but if thats too hard you can always add a bit of outline afterwards. WALA!

If you are looking for a Pokemon-inspired design and wanting your nails to look like your favourite video game character, or just want a cute and easy design that will bring a smile to anyone who sees it then read on to find out how to do these Pikachu nails!
1. Put on a base coat of solid yellow on all your nails (I recommend 2 coats)
2. Once your nails are completely dry use a large dotting tool to make two black dots on your index and ring finger. You can purchase dotting tools from lots of good retailers for example Boots, Topshop,Ebay and Amazon have this great five piece set :
http://www.amazon.co.uk/Dotting-Double-Marbling-Different-Cheeky/dp/B005FJQQMC
3. Use the dotting tool to put the red dots on your thumb and little finger to make Pikachu's cheeks.
4. Once that is dry as neat as you can put small white dots in the middle of the black circles to make Pikachu's eyes, then you can draw on the nose and zig zag mouth by either buying a nail striper or you could do what i used which was a toothpick which works even better in my opinion or even an old hairclip.
5. Wait for your nails to dry then add a top coat of any clear nail varnish of your choice then let it dry and your done and you have the cutest nails ever!! :)
The nail varnish i used was Rimmel Lycra Pro Nail Polish from Fragrance Direct which was on offer for only 99p a bottle *BARGAIN*


|
The nails above were purchased from a local boutique so im afraid i cant put a link for you all to buy them but i found some even better reindeer nails online made by Elegant Touch which are the best falsies in my opinion! You are guaranteed to get lots of compliments on them and they have come out with a nice collection of Christmas nails so buy them while you can, the picture to the left shows how amazing the Elegant Touch nails are :)
|
Simple Reindeer Nails!
False nails can help you go from everyday to glamorous in an instant, add the finishing touch to your Christmas outfit with this festive reindeer nail art.
These nails were purchased from a local boutique so im afraid i cant put a link for you all to buy them but i found some even better reindeer nails online made by Elegant Touch which are the best falsies in my opinion! You are guaranteed to get lots of compliments on them and they have come out with a nice collection of christmas nails so buy them while you can.
Soak your nails. Giving yourself a quick manicure prep before applying fake nails will keep your nails healthy and ensure the fake nails stay on for as long as possible. Start by soaking them in warm water for about five minutes, until they're nice and soft. Dry your hands and nails with a cloth.
Trim and file your nails. Use a nail clipper or nail scissors to trim your nails so that they're all even. Trim them short, but not to the quick; you want a bit of an edge to give the fake nails more to hold onto. Use a nail file to give your nails a good smooth edge.
Push back your cuticles. While your nail beds are still soft from the soak, use an orange stick or cuticle pusher to gently push back your cuticles. This way you can make sure you're gluing the fake nails to your nails, not your skin.
Buff your nails. Use a nail buffer to buff your nails well. This will create a slightly rough surface, making it easier for the fake nails to stick. Wipe off the dust when you're finished.
Lay out your fake nails. Open up the package and lay all the nails out in the order you will be placing them on your nails. The largest fake nails will go on your thumbs, and the smallest will go on your littlest fingers. Make sure the nails fit comfortably over your real nail, and use a file to shape the bottom edges if necessary.
False nails can help you go from everyday to glamorous in an instant, add the finishing touch to your Christmas outfit with this festive reindeer nail art.
These nails were purchased from a local boutique so im afraid i cant put a link for you all to buy them but i found some even better reindeer nails online made by Elegant Touch which are the best falsies in my opinion! You are guaranteed to get lots of compliments on them and they have come out with a nice collection of christmas nails so buy them while you can.
Soak your nails. Giving yourself a quick manicure prep before applying fake nails will keep your nails healthy and ensure the fake nails stay on for as long as possible. Start by soaking them in warm water for about five minutes, until they're nice and soft. Dry your hands and nails with a cloth.
- You can add some body wash or hand soap to the water if you want, but don't soak your hands in a solution that contains oil. While a good oil soak is a great way to moisturize your hands, having traces of oil on your nails before you apply fake nails will make it harder for them to stick.
Trim and file your nails. Use a nail clipper or nail scissors to trim your nails so that they're all even. Trim them short, but not to the quick; you want a bit of an edge to give the fake nails more to hold onto. Use a nail file to give your nails a good smooth edge.
Push back your cuticles. While your nail beds are still soft from the soak, use an orange stick or cuticle pusher to gently push back your cuticles. This way you can make sure you're gluing the fake nails to your nails, not your skin.
- Don't trim your cuticles, just push them back. Your cuticles protect your nail beds from getting infected, and trimming them increases the risk that dirt or germs could accumulate there.
Buff your nails. Use a nail buffer to buff your nails well. This will create a slightly rough surface, making it easier for the fake nails to stick. Wipe off the dust when you're finished.
Lay out your fake nails. Open up the package and lay all the nails out in the order you will be placing them on your nails. The largest fake nails will go on your thumbs, and the smallest will go on your littlest fingers. Make sure the nails fit comfortably over your real nail, and use a file to shape the bottom edges if necessary.
- The easiest fake nails to apply require a simple application using nail glue. Your kit should come with a nail for each finger and a little bottle of adhesive.
- Apply the first nail. Swirl a dab of glue on your real nail, and another dab of glue on the part of the fake nail that will be attached to you (not the part that will be sticking up). Carefully place the fake nail directly over your real nail so that the bottom curve lines up perfectly with your cuticle. Press it down and hold for 10 seconds to let it set.
- Make sure the nail is set firmly against your real nail, with no gaps.
- Don't use too much glue. You don't want it to squirt out the sides. A few dabs will be sufficient. If glue does squirt out, use a cotton swab to gently wipe it away.
- Be very careful not to put the nail on crooked. The glue dries fast.
- Start applying nails to your dominant hand first.
- Repeat with the remaining nails. One by one, glue each nail on using a dab of glue. Remember to press each nail for 10 seconds to make sure they are sealed tight against your real nails.
- File the nails into your desired shape. You can use a regular nail file to file them into the classic square or oval shape, or any shape you like. If you're happy with the shape of the nails straight from the package, no need to file!
- The Elegant Touch kit comes with 24 nails in 10 sizes,adhesive tabs, a buffer (aka rough nail file) and instruction leaflet. To be honest with you im not a massive fan of the adhesive tabs they dont keep them stuck to your nails for very long and they are a bit flimsy so i suggest you try Elegant Touch Super Adhesive Tabs http://www.eleganttouch.com/super-adhesive-tabs.html
- The adhesive tabs are extremely strong and your nails will probably at least last for a whole week!
- The colour of these nails do not fade at all with wear and they are so festive and remind me of xmas jumpers and socks :)
- Elegant Touch Reindeer Christmas Nails are available at ASOS, Tesco, Boyes, New Look, River Island, Look Fantastic And Boots.
- They retail at £7.10 in different styles and colours and some shops on ebay have some on sale :)
